You may try Photo DVD Burner Professional, which enables you to create digital photo slideshows for TV, PC, iPod, iPad, PSP, Website, YouTube, MySpace and more. It also allows you to burn your slideshows to DVD discs to play on DVD Player.
Source: http://www.photodvdburner.com
8/24/2010
[Review Summary] SocuSoft Web Video Player
[Review Summary] SocuSoft Web Video Player
Software site: http://www.web-video-player.com
Version reviewed:v1.20
Supported OS: Windows 2000/XP/2003/Vista 32Bit/Win 7 32Bit
For the detail:
SocuSoft Web Video Player is a program that allows users to easily publish videos onto a website. It has two parts to the program, a web video generator that does the actual video publishing, and a video converter that converts non-FLV videos to FLV format which can then be used in the web video generator.
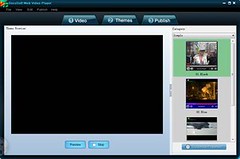
This is what the main program window of SWVP (SocuSoft Web Video Player) looks like:
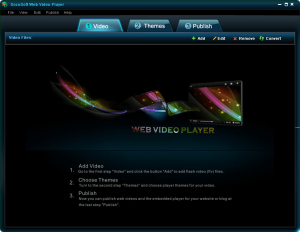
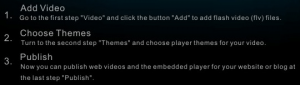
Using SWVP is very easy (I was actually surprised how simple it is.) - you add your video(s), select a theme, and publish. However, to assist users nonetheless, the developer has written direction write onto the main program window on how to operate SWVP:
When adding videos, keep in mind that SWVP allows you to publish multiple videos together into one package. In other words, you can add multiple videos and the videos will be shown together in the output video (the "frames" that you select will allow you a little flexibility on how multiple videos are shown, such as selecting a thumbnail view). If you are going to publish multiple videos together, be sure to load them into the program as the order you want them to be published because there are no built-in features for you to change the order of the videos once you have them loaded. Since the common format for showing videos on the web is FLV, SWVP only takes FLV videos as input. However, SWVP has a built-in video converter that allows users to convert other video formats to FLV, which can then be loaded into the web video generator and used. I will discuss the video converter more in detail a bit later.
After you have loaded all the videos you want to load, you can change some metadata for the videos by clicking the "Edit" button if you wish:

Otherwise, after loading the videos, you need to click on the "Themes" tab and select the frame your output video will have:
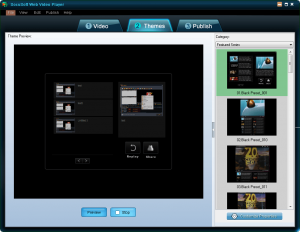
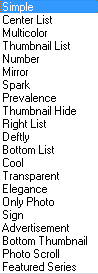
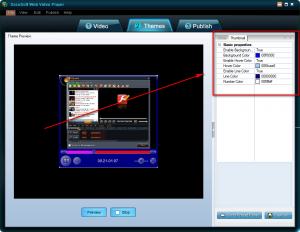
There are many different frames for you to select from; clicking on the "Category" drop down menu gives you access to different categories of frames, with each category having multiple frames in it to select from:
Once you select a frame, you can optionally change its settings (and thus changing how your output video will look) by clicking on the "Customize Properties" button...
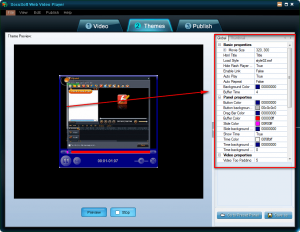
...and/or click the "Preview" button to preview how the video will look once you have published it. Once you are happy with the video frame and how it will look, click on the "Publish' tab and publish the video:
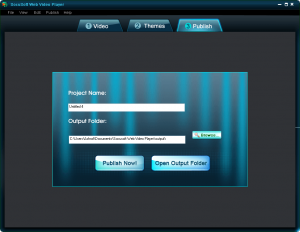
All videos are published locally on your computer; you need to manually upload them onto your website (and do some basic HTML copy/pasting/tweaking if you want the video to show on a page other than the default HTML page generated by SWVP). In that regard, I actually was fairly impressed with how organized the published videos are; I have encountered programs that just throw everything in one folder and call it a day. SWVP, however, creates subfolders and places most of the components of the video in the subfolders. There are only a few things left in the main directory making it all easy to manage. Of course, there is room for improvement such as placing everything but the HTML file - that is to display the video - in subfolders (anyone with basic HTML knowledge can make this adjustment manually if desired); however as it stands the organization is done really well.
Now, going back to the built-in video converter I mentioned earlier. So far what I have described to you has been the "web video generator" aspect of SocuSoft Web Video Player. Like I have mentioned several times already, there is a built-in video converter aspect of SocuSoft Web Video Player also (so users can convert their non-FLV videos to FLV format which can then be used for the web video generator). To access this video converter, one simply needs to click on the "Convert" button located on the main program window of SWVP; the button will open up the video converter:

The video converter is also fairly easy to use with directions written on the main window for those who are lost.
The video converter supports these following input formats:
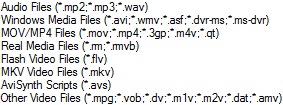
For output formats, I thought the video converter would only support FLV videos (since that is the video format that is supported by the web video generator), but surprisingly enough it supports many output formats:

The Good
• Straightforward and very easy to use.
• Allows users to select from many different video "frames".
• Allows users to publish multiple videos together into one package.
• Organizes published videos in a fairly clean manner making it easy to transfer onto a website/server when needed.
• Has a built-in video converter that can convert non-FLV videos to FLV videos which are then usable with the web video generator.
• Video converter does more than just to FLV conversions; it supports many input and output formats.
The Bad
• Needs the ability to be able to publish directly to a website, such as via FTP.
• No feature to change the order of videos if multiple videos are being published together.
• Integration of the built-in video converter and the web video generator can be improved.
Rating (out of 10)
Ease of Use 8
There are two main problems in easiness to use: the built-in video converter and the web video generator can be integrated a bit better (i.e. having the ability to automatically import videos into the web video generator after they have been converted) and there is no feature to change the order of videos if multiple videos are being published together. Otherwise, very, very easy to use.
Performance 10
Performs well for what it does.
Usefulness 3
I can't see too many people finding this program useful. First, you need to be able to upload videos to a website for this program to be of any use. However, even some website owners may not find this program useful because many webmasters now use third party video hosting services - like YouTube - to host their videos. Any video uploaded onto YouTube, or other video hosting website, will automatically come with a player so this program would be useless.
Price 7
Seeing as this program is targeting websites (most of which will be businesses) - and that it has a fully-featured video converter built in - $49.95 is not a bad price at all. However, taking into consideration that there are a number of alternative methods to accomplish the same thing that this program does, the developer may want to consider knocking down the price $10-20 to be attractive to a larger audience.
Arbitrary Equalizer 8
This category reflects an arbitrary number that does not specifically stand for anything. Rather this number is used to reflect dotTech's overall rating/verdict of the program in which all the features and alternatives have been considered.
Software site: http://www.web-video-player.com
Version reviewed:v1.20
Supported OS: Windows 2000/XP/2003/Vista 32Bit/Win 7 32Bit
For the detail:
SocuSoft Web Video Player is a program that allows users to easily publish videos onto a website. It has two parts to the program, a web video generator that does the actual video publishing, and a video converter that converts non-FLV videos to FLV format which can then be used in the web video generator.
This is what the main program window of SWVP (SocuSoft Web Video Player) looks like:
Using SWVP is very easy (I was actually surprised how simple it is.) - you add your video(s), select a theme, and publish. However, to assist users nonetheless, the developer has written direction write onto the main program window on how to operate SWVP:
When adding videos, keep in mind that SWVP allows you to publish multiple videos together into one package. In other words, you can add multiple videos and the videos will be shown together in the output video (the "frames" that you select will allow you a little flexibility on how multiple videos are shown, such as selecting a thumbnail view). If you are going to publish multiple videos together, be sure to load them into the program as the order you want them to be published because there are no built-in features for you to change the order of the videos once you have them loaded. Since the common format for showing videos on the web is FLV, SWVP only takes FLV videos as input. However, SWVP has a built-in video converter that allows users to convert other video formats to FLV, which can then be loaded into the web video generator and used. I will discuss the video converter more in detail a bit later.
After you have loaded all the videos you want to load, you can change some metadata for the videos by clicking the "Edit" button if you wish:
Otherwise, after loading the videos, you need to click on the "Themes" tab and select the frame your output video will have:
There are many different frames for you to select from; clicking on the "Category" drop down menu gives you access to different categories of frames, with each category having multiple frames in it to select from:
Once you select a frame, you can optionally change its settings (and thus changing how your output video will look) by clicking on the "Customize Properties" button...
...and/or click the "Preview" button to preview how the video will look once you have published it. Once you are happy with the video frame and how it will look, click on the "Publish' tab and publish the video:
All videos are published locally on your computer; you need to manually upload them onto your website (and do some basic HTML copy/pasting/tweaking if you want the video to show on a page other than the default HTML page generated by SWVP). In that regard, I actually was fairly impressed with how organized the published videos are; I have encountered programs that just throw everything in one folder and call it a day. SWVP, however, creates subfolders and places most of the components of the video in the subfolders. There are only a few things left in the main directory making it all easy to manage. Of course, there is room for improvement such as placing everything but the HTML file - that is to display the video - in subfolders (anyone with basic HTML knowledge can make this adjustment manually if desired); however as it stands the organization is done really well.
Now, going back to the built-in video converter I mentioned earlier. So far what I have described to you has been the "web video generator" aspect of SocuSoft Web Video Player. Like I have mentioned several times already, there is a built-in video converter aspect of SocuSoft Web Video Player also (so users can convert their non-FLV videos to FLV format which can then be used for the web video generator). To access this video converter, one simply needs to click on the "Convert" button located on the main program window of SWVP; the button will open up the video converter:
The video converter is also fairly easy to use with directions written on the main window for those who are lost.
The video converter supports these following input formats:
For output formats, I thought the video converter would only support FLV videos (since that is the video format that is supported by the web video generator), but surprisingly enough it supports many output formats:
The Good
• Straightforward and very easy to use.
• Allows users to select from many different video "frames".
• Allows users to publish multiple videos together into one package.
• Organizes published videos in a fairly clean manner making it easy to transfer onto a website/server when needed.
• Has a built-in video converter that can convert non-FLV videos to FLV videos which are then usable with the web video generator.
• Video converter does more than just to FLV conversions; it supports many input and output formats.
The Bad
• Needs the ability to be able to publish directly to a website, such as via FTP.
• No feature to change the order of videos if multiple videos are being published together.
• Integration of the built-in video converter and the web video generator can be improved.
Rating (out of 10)
Ease of Use 8
There are two main problems in easiness to use: the built-in video converter and the web video generator can be integrated a bit better (i.e. having the ability to automatically import videos into the web video generator after they have been converted) and there is no feature to change the order of videos if multiple videos are being published together. Otherwise, very, very easy to use.
Performance 10
Performs well for what it does.
Usefulness 3
I can't see too many people finding this program useful. First, you need to be able to upload videos to a website for this program to be of any use. However, even some website owners may not find this program useful because many webmasters now use third party video hosting services - like YouTube - to host their videos. Any video uploaded onto YouTube, or other video hosting website, will automatically come with a player so this program would be useless.
Price 7
Seeing as this program is targeting websites (most of which will be businesses) - and that it has a fully-featured video converter built in - $49.95 is not a bad price at all. However, taking into consideration that there are a number of alternative methods to accomplish the same thing that this program does, the developer may want to consider knocking down the price $10-20 to be attractive to a larger audience.
Arbitrary Equalizer 8
This category reflects an arbitrary number that does not specifically stand for anything. Rather this number is used to reflect dotTech's overall rating/verdict of the program in which all the features and alternatives have been considered.
1/27/2010
Socusoft Web Video Player Templates - Powerful multimedia processing and web video design
Preview Screenshots:
http://www.web-video-player.com/sampleplayer.php
Bottom List - MSN Classic Style
http://www.web-video-player.com/template/bottomList.php
http://www.web-video-player.com/sampleplayer.php
Bottom List - MSN Classic Style
http://www.web-video-player.com/template/bottomList.php
Right List
http://www.web-video-player.com/template/rightlist.php
Center List
http://www.web-video-player.com/template/rightlist.php
Bottom Thumbnail
http://www.web-video-player.com/template/rightlist.php
Simple
http://www.web-video-player.com/template/simple.php
Sign
http://www.web-video-player.com/template/sign.php
Photo Scroll
http://www.web-video-player.com/template/photoscroll.php
Number
http://www.web-video-player.com/template/number.php
Only Photo
http://www.web-video-player.com/template/onlyphoto.php
Prevalence
http://www.web-video-player.com/template/prevalence.php
Transparent
http://www.web-video-player.com/template/transparent.php
Multicolor
http://www.web-video-player.com/template/multicolor.php
Mirror
http://www.web-video-player.com/template/mirror.php
Spark
http://www.web-video-player.com/template/spark.php
Elegance
http://www.web-video-player.com/template/elegance.php
Advertisement
http://www.web-video-player.com/template/advertisement.php
Cool
http://www.web-video-player.com/template/cool.php
Deftly
http://www.web-video-player.com/template/deftly.php
Thumbnail Hide
http://www.web-video-player.com/template/thumbnailhide.php
Thumbnail List
http://www.web-video-player.com/template/thumbnaillist.php
11/25/2009
Christmas Wishes 2009 – Fantastic Free Gift . Music Video
Christmas Wishes 2009 – Fantastic Free Gift . Music Video
http://www.web-video-player.com/music-video-christmas/merry-christmas.html
Christmas Wishes and New Year Greetings to Your Friends
How time flies! Christmas 2009 is around the corner and New Year, too! I would like to share with you a fantastic free gift for your family, relatives and friends. It is a sweet music video and it is free. You may send the gift to anyone on the Internet easily when Christmas comes.
Greetings Page: (Ready made wishes to be sent by MSN, Yahoo Messenger, Skype or emails to your friends)
http://www.web-video-player.com/music-video-christmas/merry-christmas.html

http://www.web-video-player.com/music-video-christmas/merry-christmas.html
Christmas Wishes and New Year Greetings to Your Friends
How time flies! Christmas 2009 is around the corner and New Year, too! I would like to share with you a fantastic free gift for your family, relatives and friends. It is a sweet music video and it is free. You may send the gift to anyone on the Internet easily when Christmas comes.
Greetings Page: (Ready made wishes to be sent by MSN, Yahoo Messenger, Skype or emails to your friends)
http://www.web-video-player.com/music-video-christmas/merry-christmas.html
8/11/2009
A Powerful Tool – Make Your Video Play Directly on Your Website and Blog
Office source of the cool app:
http://www.web-video-player.com/
Via Google Blog:
http://funny-video-youtube.blogspot.com/
Socusoft Web Video Player is an interesting but powerful tool which I came across on a download site a few days ago. This program allows you to publish your video clips of various formats on your website, blog, forum and more, making it play videos directly online. It just needs simple steps to complete a web video. Different from videos on YouTube, The web video generated by this program has an embedded player, which can be fully customized.
The principle of this application is to integrate your video with a player together with relevant output codes to be embedded into HTML of your webpage or blog. It will take you three steps to make a web video. The input files accept FLV format only so as to enable output video player to playback clips. You may meet with the problem about videos of different formats. Well, it has a conversion component which accepts various video formats, making it easy to convert your files to FLV format.
Socusoft Web Video Player: http://www.web-video-player.com/
Key features summary:
-- GUI is easy to navigate
-- No time or other key limits
-- Support most video formats
-- Single/batch video input and conversion
-- Quick editing of video file properties
-- Cool themes for web videos
-- Rich parameter settings for web videos
-- Show/Hide of video play list and playback feature
-- Extremely easy to publish web videos and embedded player
-- Convenient to get ready-made files for Dreamweaver or FrontPage
Deficiency of this app: Not compatible with Mac
You guys can go to its website for more information about its features and functions. As stated on its site: the trial version generates web videos with a logo at the top left corner of the web player which links to its website. The logo is no big deal for us video fans. As for trial version’s another point: URLs such as company URL and advertisement links also cannot be added to the web videos. I would like to say: the advertisement links adding function is useful to businessmen and website promoters only. So, as for us, don’t worry about it as there is no time limit or other key limits. We can still use it freely for fun and experience its cool features. I think you can find out more and you may report back here in the comments.
PS: Tutorial -- How to Make Web Videos Easily such as Video News on Yahoo, MSN and YouTube
Here is the tutorial link:
http://funny-video-youtube.blogspot.com/
8/10/2009
Explore Free Functions of Socusoft Web Video Player
Explore Free Functions of Socusoft Web Video Player
>> Free YouTube/Google video wizard download – It allows users to download YouTube/Google videos easily and conveniently
>> Integrated free video player – It accepts various video formats such as MOV, WMV, FLV, MPEG-4, MPG, RM, RMVB, AVI, VOB, ASF, DV, 3GP, M1V and M2V
Socusoft Web Video Player is an excellent tool which is integrated with powerful functions such as web video creation, video conversion (including video
merging, video trimming, video playing), YouTube/Google video download and audio extraction. It provides fantastic solutions for making web videos.
merging, video trimming, video playing), YouTube/Google video download and audio extraction. It provides fantastic solutions for making web videos.
Let’s start our journey to explore free functions of Socusoft Web Video Player and find out the details.
Download and install [url=http://www.web-video-player.com]Socusoft Web Video Player[/url]. Done! Launch it and let’s move to the next step. Click "Convert" on the upper right side
to open the integrated converter.

>> Free YouTube/Google video wizard download
Now, you will see its friendly user interface. Click "YouTube" on the upper right side and a pop-up window "Import Video from Internet" will appear. This is well prepared for users to
download YouTube/Google video conveniently.

Now, let’s go to fetch YouTube/Google videos. I want to get the video music "Right Here Waiting", so I go to the search box on YouTube.com and got it.

Got the search result, open the link and copy the URL of the video page from the web browser.
Go back to the pop-up window "Import Video from Internet", click the "folder icon" button and paste the URL to it. It allows you to add more URLs, delete URLs and move URL items
up or down. Repeat the procedure to add more. Click "X" to delete the selected one. The arrow buttons are for moving items up and down. When ready, click "OK" at the bottom
right of the pop-up window.

After that, double click the bar to download the video from YouTube.

When completed, you will have different choices to deal with videos such convert them into different formats, merge them, trim them, extract audio, or even play them directly.
If you want to convert them into other formats or just extract audio. Follow me again to find out more. Choose one video and go to "Profile" and choose output format on the drop-
down menu.

You can now click "Encode" button to start video conversion or audio extraction. When completed, click "Folder" to get the music. Done!
>> Integrated free video player
The integrated converter is also a completely free media player which accepts various video formats such as MOV, WMV, FLV, MPEG-4, MPG, RM, RMVB, AVI, VOB, ASF, DV,
3GP, M1V and M2V.
Click the button "Add Video" to launch your movie. In "stop" mode, double click the video display area to enlarge display size. Click "Maximize" button to get full screen. Double
click display area again to go back the normal size.

More functions of Socusoft Web Video Player: http://www.web-video-
player.com/webvideoplayer.php
7/07/2009
How to Convert Videos and Publish Them to the Website or Blog
After you finish reading this article, you may find that embedding videos into a web page will not be a challenge any more.
There are lots of Internet videos of different formats such as mpeg, avi and QuickTime (mov), while the most popular format currently is flash video (.flv). And the most commonly used method to embed video today is via a .flv file and a Flash player. In this article, we will discuss how to convert videos of different formats into .flv format and add them to your website or blog.
Well, it's still a process from creating your own videos to publishing them to your site or blog, but there are some excellent tools that don't require you to be a video expert in order to use them effectively! For creating videos, you may use Windows Movie Maker. For converting videos, right here I use Clone2Go Video Converter Free Version. For publishing videos, I recommend Socusoft Web Video Player. Simple steps are needed. You may find that embedding a video onto a web page is as easy as cutting and pasting.
(First Part: How to Convert Videos)
First Step: Check Video Format -- Convert Video into FLV
After installation of video converter, launch the program. Go to File -> Add Video Files. If you need to convert movies in batches, select “Batch Add Video Files”. You can also capture Video from DV by selecting “capture Video from DV” when necessary.
When the input video file is ready, turn to the profile at the bottom right of the main window for the options of output video formats and choose "Flash Video Movie (*.flv)". After that, click “Encode” to start video conversion. When finished, click "Folder" icon at the top shortcut menu to get the converted video.
(Second Part: How to Add Videos to Your Site or Blog)
Second Step: Download and Install Socusoft Web Video Player
Before we go any further, we need to a professional web video publishing tool -- Socusoft Web Video Player. Download it from http://www.web-video-player.com/
When installation is completed, launch Socusoft Web Video Player.
Third Step: Add Videos to Player
Go to "(1) Video" and click the button "Add" to add flash video (flv) files.
Fourth Step: Choose Themes for Player
Go to "Themes" and choose the template of web player for your video clips. There are lots of cool templates. Get one as you like or that matches the style of your website or blog. The program allows you to customize web player in advanced mode. Click to button "Customize Parameters" at the bottom right corner to find out more.
Fifth Step: Publish Video and Player
When finished the above steps, go to the sixth step "Publish". Click the button "Publish Now" to integrate your video with player. Your video has right now been embedded a cool player. You may click "View Web Page" to preview your web video.
Last Step: Upload Files – Add Video to Your Website or Blog
1) Add video to your website
Click "Open Output Folder" and use upload tools such as CuteFTP to upload all of the files in the folder of "output" to your web space. You may create a new folder on your web space first such as "video" for the output files. If the created folder is in the root directory, the URL of your web video should be:
http://www.*****.com/video/***(name of the published html file).html
2) Add web video to your blog or forum and more
You may also add your published web videos to your blog or forum and more. Here is an example of adding videos to google blog.
Click "Open Output Folder". Then, open the html file with FrontPage, Dreamweaver or Notepad. The html file is the same with the one uploaded.
Right here, I use Notepad to open the above-mentioned html file and switch to the code mode and change the paths like the following screenshot. Please note that you need to input your website URL instead of " *****.com" as shown below.
After that, copy the code between "object" as above. Go to your google blog and paste the code as shown below. After that, publish the post. You may now view your web video on google blog.
Sample: http://funny-video-youtube.blogspot.com
Some blogs may not support HTML well. If so, you may also use the following code, which is simple. That is, "iframe" plus "the path".
Support: http://www.web-video-player.com
Tutorial: http://funny-video-youtube.blogspot.com
10/27/2008
Welcome to Clone2go Converters' World
Sharp Tools for DVD, Video and Audio Conversion
Source: http://www.clone2go.com
Technical Support: http://www.clone2go.com
-- Conversion Guide, for Nokia, iPod, iPhone, PSP, Zune, Xbox, Samsung, Sony Ericsson, Motorola, Dopod, 3GP Player, MP4 Player, etc.
-- Perfect solutions, to DVD, Video and Audio Conversion. Relevant excellent tools are introduced and provided to users.
-- You can learn more about DVD, Video and Audio Conversion Guide in the following articles.
10/25/2008
How to Extract a Song from a Music Video
The Internet popularity promotes the development of online music videos. Now it has become amazingly easy to get music videos online for entertainment. Sometimes, we may want to extract a song from a music video. Now, let me tell you how to achieve it step by step.
Take a music video on YouTube as an example to show you how to extract the song. Here we go:
Log onto YouTube.com and search the music video first, as shown in the screenshot below.
Below is one of the search results. Enter the page and you will get the URL from your browser, as shown in the screenshot below.
Now you need a tool to capture the flash video and extract the song from it. There are lots of such tools, among which I recommend the powerful application Clone2go Video Converter Professional as it is not only a completely free media player, but also a powerful video conversion application. Let’s take a look at its powerful function first:
Convert video files between almost all popular formats. The input format includes: MOV, WMV, FLV, MPEG-4, MPG, RM, RMVB, AVI, VOB, ASF, DV, 3GP, M1V and M2V. The output format includes: AVI, WMV, 3GP, MPEG-4, MP3, FLV, etc.
Convert videos at high speed with perfect output quality
Extract sound tracks in MP3 format from video clips
Change video and audio properties independently
Multi-select files for batch conversion
Customize output video frame size
Split files into smaller parts
You can download the latest version of Clone2go Video Converter Professional at www.clone2go.com
After installation, launch the program. Click “YouTube” button, as shown in the screenshot below.
Now, copy the above-mentioned URL of the music video and paste it into the form of the pop-up window, as shown in the screenshot below.
After that, double click the bar to download the video from YouTube.
Downloading …
Select the video when completed.
Select the audio format that you need such as mp3, wav and ogg, as shown in the screenshot below.
Click one of the “Encode” buttons to extract audio, as shown in the screenshot below.
Then, you will see the pop-up window, as shown in the screenshot below. As it is the evaluation version, it converts each video file only for three minutes. While the Full Version can convert video files without the limit of time, which is mentioned on Clone2go.com
Anyway, click the “button” to continue with the evaluation.
Clone2go Video Converter Professional extracts audio very fast. Only a few seconds later, 65% has completed.
When completed, click “Folder” to get the music. Done!
Now, you can put the music into your portable devices such as Nokia, iPod, iPhone, PSP, Zune, Xbox, Samsung, Sony Ericsson, Motorola and Dopod and enjoy it anywhere!
9/27/2008
How to Convert DVD Movies and Videos for Nokia Series
Key points:
How to convert DVD Movies and video clips for Nokia series
How to convert video files in batches for Nokia series
How to capture video from DV for Nokia series
How to trim video that you need
How to extract audio from video clips for Nokia series
Filed Under: Guides
Tags: How To • N93 • N95
I will show you how you can convert your favorite DVD movies and video clips from your computer to watch right on the Nokia series default movie player. Take Nokia N95 for example, the Nokia N95 supports H.264 playback. Other models like Nokia N93i, Nokia N82 can also play excellent quality H.264 videos. H.264 in simple words: high quality videos at small file sizes. Enough techno blabber! Find out how right now!
When we google a video conversion tool, we may find that there are a lot of such programs. Right here, we take the professional tool Clone2go DVD Ripper as an example. Before I go any further, let’s see its powerful profile in the screenshot below.
The conversion is quick and pretty simple. Here we go:
Download the latest version of Clone2go DVD Ripper at www.clone2go.com
After installation, launch the program. You will see the classical main window of the program, as shown in the screenshot below.
Go to File -> Add Video Files. Select the movie that you need to convert. If you want to convert DVD, you may select “Open DVD”. If you need to convert movies in batches, select “Batch Add Video Files”. You can also capture Video from DV by selecting “capture Video from DV” when necessary, as shown in the screenshot below.
The shortcut buttons of “Open DVD” and “Add Video Files” in the upper window can bring you much convenience, as shown in the screenshot below.
The input video file is ready. Now it is turn to select the output video format for your Nokia mobile phone. Turn to the bottom right of the main window and click the button, as shown in the screenshot below. There are a lot of video formats listed on the drop-down menu, some of which are customized. Select “Nokia” and you will see some of the popular Nokia models listed such as N95, N93, N73, N75, E62, 5300, 6555, 6085 and 6126. Check your mobile phone model and select it. If your model is not listed there, don’t worry. You can select “Nokia 3GP series Video” or “Nokia MPEG-4 series Video”. You can also customize the format you want such as video size, video bitrate and audio bitrate, as shown in the screenshot below.
If you just want the excellent part of the video, you can trim the video. Press “play” and select the beginning. Then, press “Start to trim” button. Hold the click to move the blue dot again and select the end of video and press “stop to trim” button. For more accurate conversion, you can change the number at “Start Time” and “Stop Time”, as shown in the screenshot below.
If you just want the audio in the movie, you can extract it into mp3, wav, ogg or amr format, as shown in the screenshot below.
Now, let’s start video conversion. Click “Encode” to start video conversion, as shown in the screenshot below.
As for the conversion speed, it can be very high. Sometimes, it may be lower, depending on your computer and the size of the file.
Now, let’s get the converted video. Click “Folder” to get the converted video, as shown in the screenshot below.
That’s it! Now, get the data wire and transfer the converted video to your Nokia mobile phone and enjoy it any time.
PS: Clone2go DVD Ripper is also a powerful media player. It can play DVD movies and video clips of almost all formats such as MOV, WMV, FLV, MPEG-4, MPG, RM, RMVB, AVI, DivX, XviD, VOB, ASF, DV, 3GP, M1V and M2V. You can double click the screen to enlarge display size in “stop” mode. Double click again to go back the normal size, as shown in the screenshot below.
OK, you can play around with the settings yourself to experience the powerful function of Clone2go DVD Ripper.
Subscribe to:
Posts (Atom)
